It has been about 4 months since I built my
first home server. And 3 LENGTHY attempts at pihole
have been made. It was not a simple attempt, I will admit
considering that there was also the aspect of my own VPN
incorporated into the mix. But it is finally here... my very own
pihole server that I can access anywhere! Lets talk about it.
Well, first what is pihole? Its not super complicated, but basically
its an adblocker that lives on your wifi. The way it works is it needs
to be setup as a securirty gaurd on your network, that checks everything
that comes in or out. The way that this technically works is by it being set
as your DNS server, the machine that assings local ips.
What makes this weird is that I already had tailscale as my DNS server... so
what now?
Lucky for me Tailscale wrote an
article-->
for exactly this situation... tha almost works...
It gets you 90% of the way. But now that we have almost full context, lets walk through
how we get there.
Step 1: Setup your raspberry Pi!
This was weird but always is a fun step because you press a butotn and the flasher does all
the work for you. For me I wanted to flash from my arch machine so to download the installer I
wrongly assumed installing from source would be easiest. I was wrong due to graphical launching errors
with Qt6 and the Display manager I am using. So instead I googled (which I should have done first) and found
that arch has the installer nice and easily packaged with pacman:
sudo pacman -Syu rpi-imager
Next was get the sd card flashed... which as the joke goes with Linux systems, took far longer than it should have.
It was a matter of 'permissions' to the drive and I kept gettting this error:
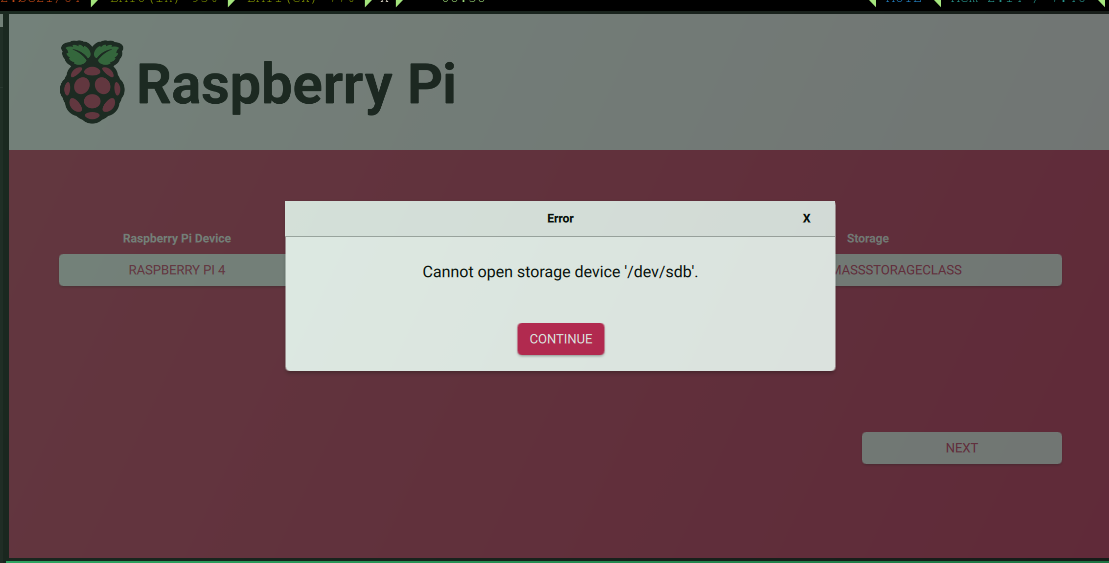
I thought the solution would be to mount the device
So first find it
lsblk -pf
Then add it to your system
sudo mkdir -p /mnt/sd
sudo mount /dev/sb(whatever is displays as) /mnt/sd
BUUUUT, no. Silly me. Computers are dumb and this did not work. So what next.
I had the stupidest idea ever... what if I just give everyone permission to do whatever the hell
they want to that dir
sudo chmod 666 /dev/sdc
... It worked. Queue eye rolls and my ensuing rage of computers.
But, now we have the rpi! or do we. I am both lazy and unmotivated
when it comes to standing up from my computer throne (couch + laptop (I use arch btw on that laptop)).
So instead of going to find a HDMI, mini-HDMI to HDMI cord, Monitor, Keyboard, Mouse, Monitor Cord and probably a gatorade for
recovery from that marathon. I decided, theres like maaaaaybe 7 devices on my network that I know most of their addresses. So how can
I find what the ip of this newly added device to the network is? 2 answers: 1 nmap (which worked almost instantaneously) and 2 my admin
panel for the network. Did I need the second one? No, not at all. Did I check anyways. Yes. :)
But step 1 was to identify what network to scan with nmap, which can be determined with a ifconfig and looking
at which network subnet your wifi is. For me I had 3 options
127.0.0, 100.0.0, and 10.0.0 I after breifly looking at it for about .5 seconds run the command
sudo nmap -sn 127.0.0.0/24
What the helly? It responds with all the possible answers. Duh. Of course it did. I just scanned myself. Bruh.
So, correctly after this I scanned the network for the devices up:
sudo nmap -sn 10.0.0.0/24
MAC Address: XX:XX:XX:XX:XX (Raspberry Pi Trading)
Nmap scan report for pi.hole (10.0.0.1)
MAC Address: XX:XX:XX:XX:XX (Raspberry Pi Trading)
Nmap scan report for pi.hole (10.0.0.2)
Great! Now I have the IP of the pi so that I can access it over ssh (and I didnt even need to stand up)
So, one ssh command later I am on the pi. And I am asking myself why did I see 2 ips? Well the asnwer is,
I auto configured the wifi and then also plugged it into the router with a ethernet cord. Just for a matter
of keeping my system as simple as possible I decided to get rid of this wifi connection. And to do so I discovered
a new commnad with nmcli (network command line interface)
sudo nmcli connection down "preconfigured"
So! Now I only have to worry about my ethernet connection.
What next in setting up this pi? There was 4 things that occured to me that I would need to get this
setup the way that I want: Vim (becasue nano makes me want to bang my head against the keyboard), tailscale,
and UFW (universal firewall). All three of which can be promptly installed with the 3 commands (plus the normal sys upgrade):
sudo apt update && sudo apt full-upgrade -y
sudo apt install -y vim-gtk3 # for clipboard things
curl -fsSL https://tailscale.com/install.sh
sudo apt install ufw
Now That I have everything that I need on the pi it was a matter of follwing the instructions
given to be in the link! Right? if I do everything they outline it should work... We get through it
I log onto my phone to test and no... there is no internet connection. Okay what next? Well there was 2 changes
needed to get this system working. Here is what I needed to do
1: In the pihole admin page, you must allow access from certain ports in the advanced DNS settings sections
2: UFW (DUH)
sudo ufw allow in on tailscale0 proto udp to any port XX
And the same with TCP. After doing this, setting my IP to static, really locking up my UFW, running some testing dig
commands to see if the internet really works. I FINALLY did it, pihole is now operational!